


Mobile App Development Company: Empowering Businesses with Infozion

Mobile App Development Company: Empowering Businesses with Infozion
Mobile apps have revolutionized the way businesses interact with customers. They’ve become a cornerstone of the digital era, providing convenience, accessibility, and innovative solutions. If you’re exploring mobile app development company, Infozion stands out as a premier choice. In this article, we’ll dive deep into mobile app development services, the benefits of investing in this technology, and why Infozion is the best partner for your app development journey.
What Are Mobile App Development Services?
Mobile app development services encompass the design, development, and deployment of applications tailored for mobile devices. These services cater to businesses looking to:
- Establish a direct communication channel with their audience.
- Enhance user experience through intuitive and functional interfaces.
- Increase brand visibility and customer engagement.
Types of Mobile App Development
- Native Apps: Designed specifically for iOS or Android platforms, offering optimal performance.
- Hybrid Apps: Built using web technologies, making them functional across multiple platforms.
- Web Apps: Browser-based applications that mimic the feel of native apps.
Benefits of Mobile App Development
Investing in a mobile app can transform your business. Here are the key benefits:
1. Enhanced Customer Engagement
- Push notifications keep customers informed about updates, offers, and news.
- Personalized features increase user retention and satisfaction.
2. Boost in Revenue
- In-app purchases and premium features open new revenue streams.
- Simplified customer journeys lead to higher conversions.
3. Improved Brand Recognition
- A unique app boosts your brand’s presence in a competitive market.
- Consistent branding across platforms establishes trust.
4. Data-Driven Insights
- Mobile apps provide valuable analytics on user behavior.
- This data aids in refining marketing strategies and improving services.
How Infozion Can Benefit You More
When it comes to mobile app development, Infozion offers a blend of creativity, technical expertise, and business acumen. Here’s what sets us apart:
1. Tailored Solutions
At Infozion, we believe every business is unique. Our team crafts bespoke apps that resonate with your brand’s goals and audience needs.
2. Expertise Across Industries
With experience spanning e-commerce, healthcare, education, and more, we understand the nuances of different sectors. This allows us to deliver industry-specific solutions.
3. Cutting-Edge Technology
- Leveraging the latest frameworks and tools, we ensure your app is future-ready.
- Our tech stack includes React Native, Flutter, Swift, Kotlin, and more.
4. Dedicated Support
We’re not just developers; we’re partners in your growth. From ideation to post-launch support, Infozion stays with you every step of the way.
Advantages of Mobile App Development with Infozion
Choosing Infozion guarantees:
1. Seamless User Experience
Our apps prioritize user experience, ensuring intuitive navigation and attractive designs.
2. Scalability
We design apps that grow with your business, accommodating future features and user loads.
3. Robust Security
Data security is a top priority. Our apps comply with the highest security standards to protect your sensitive information.
4. Cost-Effective Solutions
Infozion offers competitive pricing without compromising quality, making top-tier app development accessible to all businesses.
Why Infozion Is the Best Mobile App Development Company
Proven Track Record
With a portfolio of successful projects and satisfied clients, Infozion has established itself as a trusted name in the industry.
Agile Development Methodology
We employ agile practices to ensure rapid development and adaptability to changing requirements.
Innovative Approach
Infozion thrives on innovation. Our team constantly explores new ideas to deliver apps that stand out in the market.
Client-Centric Philosophy
Your success is our success. We prioritize your business objectives, ensuring the app aligns perfectly with your vision.
Steps to Partner with Infozion
1. Consultation
Discuss your ideas, goals, and expectations with our team.
2. Planning
We create a comprehensive development plan, including timelines and deliverables.
3. Development
Our experts bring your vision to life, incorporating your feedback at every stage.
4. Testing
Rigorous testing ensures your app is free of bugs and delivers optimal performance.
5. Launch and Support
We assist with app store submissions and provide ongoing support post-launch.
Why Mobile Apps Are Crucial in 2025 and Beyond
The world is becoming increasingly mobile-centric. Here’s why your business needs a mobile app now more than ever:
- Global Smartphone Usage: With billions of users worldwide, apps are the primary way people interact with brands.
- Evolving Consumer Expectations: Customers demand convenience, personalization, and real-time interaction—all possible with a well-designed app.
- Competitive Edge: Businesses with apps have a distinct advantage in staying relevant and top-of-mind.
In an era where digital presence is synonymous with brand success, mobile applications have become the linchpin for dynamic business strategies. Particularly in Australia, where the tech sector is burgeoning, choosing the right mobile app development service can be a game-changer.
Why Mobile App Development Matters in Australia
Australia’s digital landscape is fertile ground for tech innovation, making it an ideal environment for mobile app development. Here’s why leveraging this capability is crucial:
- Growing Tech Hub: Australia is rapidly becoming a tech hub, with cities like Sydney, Melbourne, and Brisbane leading the way in tech innovation.
- High Mobile Penetration: With one of the highest smartphone penetration rates globally, Australia offers a vast audience for mobile apps.
- Supportive Business Environment: The Australian government supports tech development through grants and tax incentives, fostering a conducive environment for tech companies.
Leading Australian Mobile App Development Services
Choosing a Best Mobile App Development Services in Australia is no small feat. Below is a curated list of top-tier developers that not only promise but deliver excellence:
1. Appster – Melbourne
- Focus: Custom mobile app solutions that scale.
- Notable for: Pioneering a user-centric development methodology and for their robust client collaboration model.
2. Launchpad App Development – Brisbane
- Focus: Bringing startup ideas to market with cost-effective solutions.
- Notable for: Their rapid development processes and post-launch support system.
3. Buzinga – Sydney
- Focus: Innovative mobile app development.
- Notable for: Their commitment to transformative digital experiences and a strong focus on user engagement.
4. Fireart Studio – Perth
- Focus: Artistic design combined with technical functionality.
- Notable for: Exceptional design aesthetics and intuitive user interfaces.
How These Services Stand Out
What sets these services apart isn’t just their technical prowess but their holistic approach to development. Here’s what makes them leaders:
- Innovative Practices: These firms are on the cutting edge of app development technologies and methodologies.
- Custom Solutions: They excel in tailoring functionalities to the specific needs of businesses, enhancing both user engagement and ROI.
- Agile Methodologies: Their use of agile methodologies ensures that projects are completed efficiently, with regular updates and adaptability to change.
Industries Revolutionized by These Developers
Australian app developers have made significant inroads in various sectors by providing specialized app solutions. Here are a few:
- Healthcare: Apps improving patient care through innovative telehealth solutions.
- Finance: Secure and intuitive fintech apps that offer seamless banking experiences.
- Education: Interactive learning apps that make education accessible and engaging.
- Retail and E-commerce: Robust e-commerce platforms that drive sales and enhance customer shopping experiences.
Choosing the Right Developer for Your Project
Selecting the right app developer is pivotal. Here are some steps to guide your decision:
- Identify Your Requirements: Clearly define what you need from your app in terms of features, user base, and business goals.
- Research Their Past Work: Assess their portfolio for similar projects; this gives insight into their experience and expertise.
- Read Client Testimonials: Client reviews can offer real insights into their working style and reliability.
- Evaluate Their Communication Style: Effective communication is key to any project’s success, so ensure their style aligns with yours.
- Understand Their Pricing Structure: Ensure their pricing is transparent and fits within your budget.
Conclusion
Australia’s top Best Mobile App Development Services in Australia offer more than just programming expertise; they provide strategic partnerships to navigate the mobile-first world effectively. Whether you are a startup or an established enterprise, the developers listed here combine technical expertise, market insights, and user-focused designs to help you achieve your digital aspirations. With their help, you can unlock new business potentials and provide value to your users in unprecedented ways.
In the bustling tech hub of Noida, the demand for reliable mobile app development services is at an all-time high. With a rapidly expanding digital ecosystem, businesses are seeking top-notch services to navigate the mobile-first world.
Noida: A Tech Epicenter
Noida, or the New Okhla Industrial Development Authority, has risen to prominence as a tech center, rivaling neighboring cities. The presence of numerous IT companies, tech parks, and startups has made it a thriving hub for digital innovation. Here’s why Noida is a prime location for mobile app development:
- Tech Talent Pool: With prestigious institutions and a diverse range of companies, Noida has a steady supply of skilled developers, designers, and tech professionals.
- Proximity to Delhi NCR: Being close to the nation’s capital allows for easy access to a vast market and a plethora of business opportunities.
- Competitive Rates: Noida offers competitive pricing for services compared to other tech hubs, making it a preferred destination for businesses seeking affordable app development.
Key Services Offered by Noida’s Mobile App Development Companies
Noida’s tech companies offer a variety of services to cater to different industry needs:
- Custom App Development: Creating unique applications tailored to a client’s specific needs, including UI/UX design, coding, testing, and deployment.
- Cross-Platform Development: Building apps that work seamlessly across iOS, Android, and other platforms, maximizing reach and reducing costs.
- API Integration: Connecting apps to various third-party services, like payment gateways, social media platforms, and data analytics tools.
- Maintenance and Support: Providing ongoing updates, bug fixes, and customer support to ensure the app remains functional and secure.
App Marketing: Assisting with app store optimization (ASO), digital marketing, and analytics to ensure the app reaches its target audience and achieves its goals.
Choosing a Mobile App Development Company in Noida
With numerous companies to choose from, making the right selection can be daunting. Here’s what to consider:
- Portfolio: Evaluate the company’s previous projects, checking for diversity and relevance to your industry.
- Client Reviews: Look for testimonials from past clients, assessing their experiences and satisfaction.
- Technical Expertise: Ensure the company has expertise in the necessary technologies, such as Swift, Kotlin, Flutter, or React Native.
- Communication: Choose a company that provides clear communication and is responsive to feedback, ensuring a smooth development process.
- Post-Launch Support: Opt for a company offering ongoing support, including updates, bug fixes, and customer service.
Noida’s Leading Mobile App Development Companies
Let’s explore some of the top companies in Noida making waves in the mobile app development industry:
- Infozion: A renowned company offering end-to-end app development services, specializing in custom solutions, cross-platform apps, and robust support.
- CodeCrafters: Known for its comprehensive services, CodeCrafters has expertise in app marketing, API integration, and rapid development techniques.
- Innovatech: This company prides itself on creative solutions, excelling in UI/UX design, hybrid app development, and continuous support.
FAQs
Q: How long does it take to develop a mobile app?
A: Development time varies depending on the complexity of the app. Simple apps may take 2-3 months, while more complex projects can take 6 months or longer. Factors such as functionality, design, and testing impact the timeline.
Q: How much does it cost to develop a mobile app in Noida?
A: Costs range widely, depending on the app’s complexity and the company’s rates. Basic apps might cost around $10,000 to $50,000, while more intricate apps can exceed $100,000.
Q: How do I know if my app is secure?
A: Security is paramount. Choose a company with a strong track record of implementing robust security measures, including encryption, regular audits, and secure coding practices.
Conclusion
Noida’s thriving tech scene offers an array of options for mobile app development services in Noida. With a talented pool of professionals, competitive rates, and comprehensive services, the city is an ideal place for businesses looking to develop impactful mobile apps. By choosing the right company, businesses can navigate the digital landscape with confidence, ensuring a seamless journey from concept to launch and beyond.
Why Choose Noida for Mobile App Development?
Noida has quickly grown to become a major tech hub, thanks to:
- Skilled Talent Pool: Noida is home to a large pool of skilled developers, designers, and engineers, many of whom are highly trained and experienced in developing mobile applications for different platforms.
- Competitive Pricing: Compared to Western countries, app development costs in Noida are significantly lower.
- Technological Innovation: Noida’s tech companies are at the forefront of innovation, leveraging the latest tools, frameworks, and technologies to create high-quality apps that meet modern needs.
- Diverse Portfolio: Noida-based companies have experience working across a wide range of industries, including healthcare, e-commerce, education, and finance, providing tailored solutions to each sector.
Leading Mobile App Development Companies in Noida
1. MindIT Systems
Overview: MindIT Systems has been a prominent player in the Noida tech scene for years. They specialize in providing end-to-end app development solutions, from concept to deployment and beyond.
Key Services:
- iOS and Android Development: They create apps optimized for both iOS and Android platforms, ensuring broad market reach.
- Custom Solutions: MindIT Systems tailors solutions to meet the unique needs of each client, providing bespoke apps that drive business goals.
- UI/UX Design: Their team of designers focuses on creating user-friendly interfaces, enhancing user engagement and experience.
2. Webkul Software
Overview: Webkul Software stands out for its innovative approach to app development.
Key Services:
- Cross-Platform Development: Webkul uses frameworks like React Native and Flutter to develop apps that work smoothly across different platforms.
- API Integration: They specialize in integrating third-party APIs, ensuring apps can connect to external services and databases.
- Ongoing Support: Webkul offers post-launch support, providing updates, maintenance, and bug fixes to ensure apps run smoothly.
3. ValueCoders
Overview: ValueCoders has built a reputation for delivering high-quality, scalable app solutions to clients worldwide. Their experienced team of developers offers comprehensive services from conception to launch.
Key Services:
- Custom App Development: ValueCoders offers tailored solutions to fit each client’s specific needs, whether in e-commerce, healthcare, or fintech.
- Testing and QA: The company ensures each app goes through rigorous testing to guarantee a bug-free experience for end users.
- Post-Launch Services: ValueCoders provides maintenance and updates, ensuring apps remain functional and relevant.
4. AppInventiv
Overview: AppInventiv is known for its innovative solutions and ability to cater to various industries. They provide a range of services designed to take apps from idea to reality.
Key Services:
- Product Design: AppInventiv’s team collaborates with clients to create user-centric designs, enhancing overall app experience.
- Agile Development: They use an agile development approach, ensuring quick turnarounds and iterative improvements.
- App Marketing: AppInventiv helps clients market their apps effectively, providing strategies for user acquisition and retention.
5. Code Brew Labs
Overview: Code Brew Labs is a notable name in Noida’s app development industry, offering comprehensive services that cater to a variety of needs.
Key Services:
- End-to-End Development: Code Brew Labs handles every aspect of app development, from design and coding to deployment and marketing.
- Quality Assurance: The company prioritizes quality assurance, ensuring each app meets industry standards and client expectations.
- Tech Stack: Code Brew Labs employs a wide range of technologies, including Swift, Kotlin, and JavaScript, ensuring apps are built on robust, modern platforms.
How to Choose the Best Mobile App Development Service
When selecting a Top Mobile App Development Services in Noida, consider these factors:
- Portfolio: Review the company’s portfolio to see if they have experience in your industry and can deliver the type of app you need.
- Technological Expertise: Ensure the company has expertise in the technologies you want to use, whether it be React Native, Swift, or another framework.
- Customer Reviews: Check customer testimonials and reviews to gauge the company’s reputation and the quality of its services.
- Communication: Choose a company that communicates effectively and regularly, ensuring your project stays on track and aligned with your goals.
- Post-Launch Support: Opt for a company that offers ongoing support and maintenance to address any issues that may arise after launch.
Frequently Asked Questions
1. How much does it cost to develop a mobile app in Noida?
The cost varies depending on factors such as the complexity of the app, the number of features, the development platform, and the company’s rates. Generally, Noida offers more affordable rates compared to Western countries, with costs ranging from a few thousand to tens of thousands of dollars.
2. How long does it take to develop a mobile app?
The timeline depends on the project’s scope, complexity, and development process. Simple apps may take 2-4 months, while more complex apps can take 6 months or longer.
3. What platforms should my app support?
It depends on your target audience. If your audience predominantly uses iOS, focus on developing an iOS app. For broader reach, consider developing both iOS and Android apps or opt for cross-platform development.
4. How can I ensure my app remains relevant?
Regularly update your app with new features, bug fixes, and design improvements. Consider post-launch support services offered by development companies to help maintain the app’s relevance and functionality.
5. Can I market my app through the development company?
Some app development companies offer marketing services, while others may provide referrals or resources to help you promote your app effectively. Be sure to discuss marketing strategies early in the process to ensure your app reaches its target audience.
Conclusion
Noida’s mobile application development scene is flourishing, with companies offering comprehensive services to a variety of industries. From MindIT Systems to Code Brew Labs, Noida’s tech companies have the talent, innovation, and expertise needed to create high-quality apps that drive business growth. When choosing a development company, consider factors such as portfolio, technological expertise, and post-launch support to ensure your app is a success.
Have you ever thought of converting a great idea into a successful project? We believe in thorough prototyping. What are the secrets of prototyping? How to make a prototype that everybody loves? Let’s explore this article.
It is an articulated reality that designers would anticipate “Wow” responses. However, we generally overlook the other two feedbacks (yes, no), which come if we haven’t paid any attention to the prototyping process.
In this article, we will look at what is the process of mobile prototyping?
So, stay tuned!

(Sources- echoinnovateit.com)
What is a mobile app prototype?
A mobile app prototype is a visual representation of product development processes, the interaction of elements, and product functioning.
It brings you one step closer to your dream app development. With the help of prototyping, you can represent your ideas more confidently. It validates the proposal of the design and logic of the application.
For prototyping, one need not be a coding master. A simple prototyping tool is fair enough.
However, the features of prototyping get developed at the MVP (Minimum viable product) stage.
It is essential for the development of a successful mobile app. Also, it conserves time and money.
How to prototype an app? Secrets revealed.
Some development companies avoid the prototyping process to save few hours. However, these few hours get compensated with weeks of redesigns and bug fixing. Moreover, it is a process that a non-designer can quickly cope up. And we are here to advise you on how to do it by yourself.
(Source- mindsea.com)
Step 1: Design the project goals and sketch ideas into the paper:
Many of you have heard that legendary thoughts are born during lunchtime and sketched on a napkin. Well, the very first goal is to represent the ideas QUICKLY. No color and no art.
Do not get into broad study at this stage. Just relax and identify about what is your product’s aim? How will it deliver a unique experience, and what is the selling point?
The basic approach of the application should amaze you as well as your audiences.
Step 2: Implement competitive examination:
It is crucial to carry a competitive analysis and ensure that your mobile app prototyping is convincing. You may conduct surveys to collect qualitative and quantitative data. It will help in the decision-making process.
As we all know that a compelling product will forever make money while others will remain in the App store’s graveyard.
Step 3: Identifying the key-functionality requirements:
After having a thorough competitive analysis, you would choose the best out of all and decide why this application stands out. Based on the research, you must choose what all features you must include in your app.
It is always a better thought to start preparing the list of must-haves, good-to-have, not-good-to-have features. As an experienced mobile development company, we would prefer to bring up the functionality in an application.
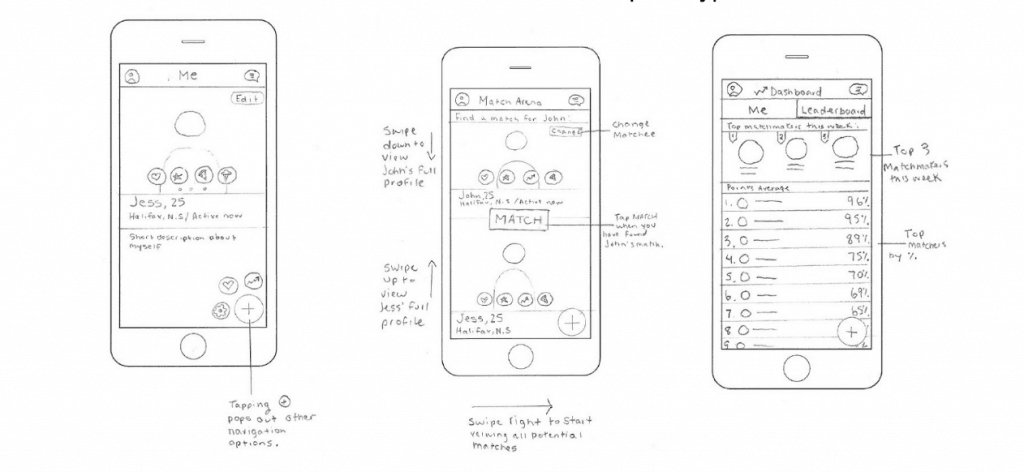
Step 4: Crafting the initial scenes:
The first initial stage is to design the rough sketches. It typically includes profile management, dashboard, and matches. Do not worry if the initial design does not work up to the finalization stage. After all, this is why we do prototyping.
(Source- mindsea.com)
Step 5: Wire framing:
Well, now you can directly start wire framing. Wire framing can be referred to as the outline of the app that lays the foundation of the entire process.
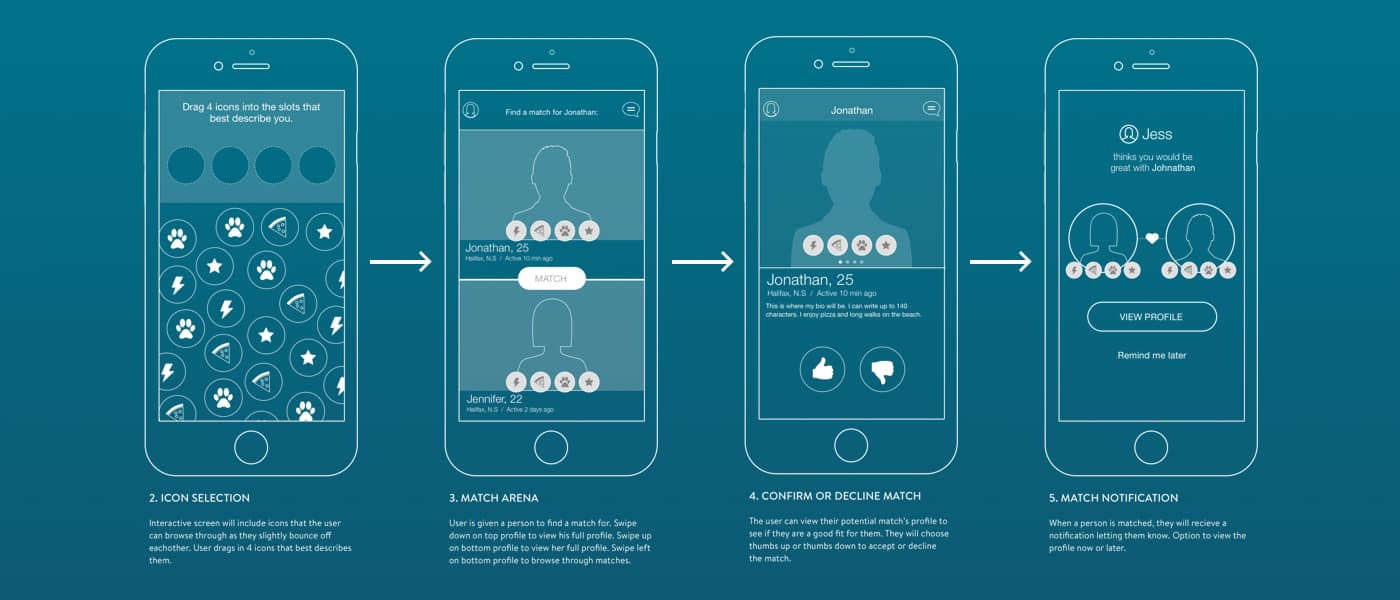
Step 6: Creating prototypes:
To encourage interactions, transform your wireframe into a clickable prototype. One can use online tools for prototyping, which will give the feel of the real future of your application.
Step 7: Testing:
Here comes the time to test the “almost-finished” designed prototype. It is the process to gather some insights and identify the areas, which need improvement. We would suggest iterating the process and do it repeatedly until you have polished the application.
Step 8: Refining the prototype:
It is an obvious step to conclude the whole process of prototyping. After collecting the insights and discovering pain points, it is an opportunity to improve the errors.
By this time, you would have received the feedbacks from users and stakeholders, so start working upon them now.
Not wrapping up, but giving a piece of advice:
Crafting your company prototypes will make you productive, definitive, and innovative. Do not forget to build it with a purpose.
Best to embrace the tools available at your disposal to strengthen your skills.
Never jump on to the things and go step-by-step.
You can hire a professional designer for prototyping.
We at Infozion technologies have extensive experience in building websites and mobile apps from scratch. Our services might be helpful in such cases as well.
Stay connected!
So, you wake up in the morning and suddenly thought having a mobile app for your business. Well, you are overwhelmed and know that it is the best idea ever. You even know that your app can lure away many customers. So, what’s the next step?
The best part of having a mobile app is a good sign for the betterment of your business. The bad part is very few apps are successful. So, what divides a tale of success and debacle- some luck? The answer is yes with a lot of correct steps.
If you consider developing a mobile application, let’s explore our comprehensive guide step-by-step. We have broken down the complete guide into nine key steps of mobile app development.

(Source- titandev.net)
The nine stages of mobile app development:
Step 1: Validating the idea:
Before proceeding to the next step, the first thing is to ensure that you are not marrying the wrong idea. The plan is worth investing in time and effort.
- App objective:
Why do you require building a mobile app? Is it needed in your industry? Is your opinion worth satisfying the target audiences?
- Target audience:
Who are your potential customers?
- App USP:
What features in your app will appeal to the target audiences? How do you differentiate it from other companies?
- Opponent examination:
Who are your opponents? Do they have a mobile application? If yes, what solutions will be provided by your steps in a better way than them?
- App investment:
Any application you develop requires money, time, and effort. Are you ready to invest?
- App marketing:
After the launching of your mobile app, what are your strategies to promote it?
Step 2: Market research:
Now comes the crucial part of your mobile development journey. Market research or analysis gives you a clear picture of the actual demand of your target customers. The question arises, how to do market analysis precisely?
- Define your objectives
- Provide your analysis survey questions
- Identify the target audience engagement
- Speak to people about your ideas to every target customers
- Keep informative survey
- List your market competitors and do a desk survey.
Step 3: Build your apps wireframe:
Once your idea is ready and, market research gets completed, it is time to put your ideas into perfect shape. A wireframe is considered the blueprint of your mobile application. It presents the layout of your app’s functionality and features.
A wireframe is mainly a theory before converting it into practice. It is the reference or a guidebook for the app developers.
Step 4: Platform choice:
Let’s continue with the process of making a platform choice. Three options are available with the platform choice process.
- Native app:
The mobile app developers can use different programming languages to develop an iOS or Android mobile application.
- Cross-Platform App/ Hybrid App:
A single mobile application can run on multiple platforms built by HTML5. These get downloaded from all the app stores like native applications.
- HTML5 Web App:
It is an optimized mobile website that looks familiar to a mobile application.
Step 5: Development:
The next step is to give proper structure to your dream project after your mobile app design clears the usability test. The process includes the coding part and the actual realization of your application.
Step 6: Test your app and improve:
One must run a code review process. It helps us to know that there are no major bugs left in coding the mobile application.
Once you have reviewed the coding process, make sure to conduct a final usability test with other colleagues. You may also find out the bugs that you missed or overlooked. You may make the final tweaks to your product.

(Source- appcircle.io)
Stages of Mobile App testing:
Let’s dive into the various mobile app testing stages. Here goes the list:
- Documentation testing:
Documentation testing, also known as preliminary testing, comes at the beginning of mobile app development. In this phase, all the developers will find the inconsistencies and settle them before the actual development begins.
- Functional testing:
It helps to test the mobile application according to the industry requirements.
- Usability testing:
This part of app testing ensures that it offers convenient browsing to all your audiences, having an excellent user interface.
- UI testing:
It ensures that all the graphical requirements are up to the mark as per the needed specifications.
- Compatibility testing:
It ensures the optimal performance of your app according to the device size, version, screen size, and hardware.
- Performance testing:
It helps to test the consistency and mobile application reaction under a specific workload.
- Security testing:
As the name suggests, security testing allows checking the risk of mobile app hackers, virus, unauthorized access, and protection of sensitive information.
- Certificate testing:
It helps to know whether your app meets the standard requirements, license agreements, terms of use, and requirements of all the play stores.
Step 7: Originate a beta version of your app:
Originating a beta version of your app draws initial adopters. These adapters provide a lot of crucial feedback about the pros and cons of your mobile application. The early users’ experience will help the admin to understand the demand of their apps.
Step 8: Launching the final version of your app:
After going through the number of pre-launching steps, there comes the time where you officially launch your mobile application on the play store or apple store.
Step 9: Post-launch activity:
If people do not know about your app, then there is no chance of downloading it. To convince the people about your app and exploring it, one should make attractive advertisements and various ways of promoting it.
Never underestimate the power of social media. Use all digital platforms to promote your app.
What’s next?
The stages of mobile application development seem to be tedious, but it is worth rewarding if you do it correctly. We hope this comprehensive guide helps you in understanding all the aspects in detail. It is suitable for both startups and established businesses.
Good luck, keep building!
If you are looking for experts to guide you through the process, feel free to contact us.
Our Experts will connect with you in 24hrs to save you hassle and time.